The Christmas jumper just wasn't going to happen - so I have decided to frog it. Its a pity as the stitch finally worked out for a raglan, but its too bulky. I may try the stitch again in the new year.
Meanwhile, I am thinking of making a swink , which has a knitted collar and cuff, and seeing as I just learned to knit a few weeks ago at the sew social. My first knitting is below and the dropped stitches are where I was attempting purls...... and when I cast off I used a crochet hook. Currently I am practicing some knitting before I start the sweater to make sure I can knit, as I am still unsure as what to do with dropped stitches and I certainly don't understand the book instruction! The second swatch is my second practice. Half way up, I decided to try seed stitch and I am not sure what I did wrong yet, but I had to unravel that row and start some plains and purls to get used to knitting and to be able to recognise the stitch (still all looking the same to me!)
I started on another up-sew, of an old cardigan. Its a primark from some years ago, and I used wear it in the summer, its incredibly thin, and has limited life left in it but I really like the colour, and remaking will extend the wearing of it. I have to stitch down the neckline, and fix the hem yet. It will be a rather light sweater. I had to make the front from three pieces as taking the pockets off made some holes, and the ribbed panel at the front of the cardigan became the centre back of the back and the side panel in the front! I used a basic jersey block and left the sleeve seam intact and just reattached the sleeve at the armhole.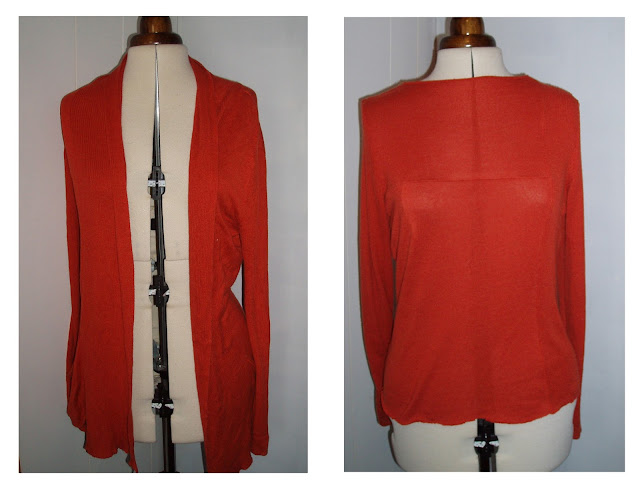

I did manage to get my cards made and printed in time for international post dates. When I used make my own cards first, I used make a lino or etched plate and print on the press (one year I even printed wrapping paper!), but in the last few years, I found the best cards were also the quick doodles/sketches I did in my notebook and since then, I do a drawing, scan and print..............
my favourite card done in the last few years is still this one..... (I finished it in photoshop and I should have done it by hand) it reminds me of the ee cummings poem, I carry your heart in my heart
Merry Happy Christmas!
the backstorySo I am not too sure of the sequence of events, but somewhere in between my saying to my sister, Eithne, that making a dress had to be easier than replacing the skirt of last years costume (her first solo dress), and her saying that it was difficult to find a new dress for her daughter Donna (neither of them saw anything they liked in the secondhand dresses for sale), that the idea of me making the dress came into play, and both of us having the same attitude, how hard can it be.....
Donna's taste in dresses is relatively restrained. She seemed to admire certain styles, but equally shied away from actually wearing some she admired, and by a process of elimination we came up with a style she wanted, and the fabric was bought in July (I had a toile made in June). Her taste is muted, and it was decided a one colour dress, a pure purple, and Donna wanted an opening on the front which was so fiddly to get even!
I drew up some embroideries, as Donna doesn't like celtic knotwork, and I naively thought I could do it in free-motion embroidery. I am using the word naive loosely as in truth, I had never done free-motion embroidery as such (I was going to hand embroider originally but all the dresses are machine done now).
 So after doing the drawings, I digitised one (another story) and emailed it to a friend far away who has an industrial embroidery machine...... and then I saw how the hand drawn and the machine lines don't work so well together, my hand drawn 'smooth' curves, became rather scratchy looking, I retraced, but it was still slightly off so it was back to the beginning. I really could not figure it out, and seemingly some dressmakers send the pieces off for embroidery and then make the dress, but I didn't even know how you would approach this, and who to send it to, and its now mid-September so I started looking at home embroidery machines. This is the type of desperate aunt I am!
I ordered a machine in October, and I got to start on the machine 3rd November and had roughly 8 days of sewing and embroidering (I work part time) to the 14th. the first few evenings I went through the machine stitches and got a feel for the machine, and from then on it was 'dress dress dress', and the work room re organised to have a second table for cutting and second sewing machine, as well as the embroidery machine on the main table!

Day 1 - Samples of patterns stitched outDay 2 - More samples, and 1 skirt panel embroidered (later changed) Day 3 - Front bodice embroidered and began running out of thread, sourced thread and ordered from Dublin to be posted down.Day 4 - Back bodice embroidered - but ran out of thread midway (so had to be ditched) cut linings, and prepped sleevesDay 5 - Back bodice and sleeves embroideredDay 6 - Basted linings, bodice sewn, 1 new skirt panel embroideredDay 7 - 2nd skirt panel embroidered, net skirt made. basted skirt to dress
The embroidery takes the longest time, after 'setting up' each skirt panels took about 4 hours each, and I also found out that it was better to have a more generous cut to each piece to keep the grains even while hooping. I downloaded some digitised swirls and joined some to make up the design. The brath design is also downloaded from urban threads. The embroidery machine is electronic which took some adjusting to, and I had a rather steep learning curve overall.
My sister and niece arrived for the fitting the following evening after work, and I sewed that evening and next morning, fixing the skirt, taking in the bodice (my niece is 12 so her measurements are changing fast!) adding more to the tutu underskirt, drafting and adding collar so they could leave the following day with the nearly finished dress to bring back as the 'bling' had to be bought and the dance teacher to see the dress, and we decided I would go up in a fortnight to help sew the bling.

The dance teacher liked the dress, and suggested HUGE stones to the front. We had decided on lattices earlier on so my sister made a start on hand sewing that and by the time I arrived 2 weeks later, she had that done, and I started hemming the dress correctly (I had it tacked), and fixing the tutu (net underskirt) and we had Donna walking, hopping, dancing, to make sure the dress was moving correctly. The large stones were glued in place then sewn, they are quite amazing as they are crystal so really catch the light. My sister blinged the 'brath' (back cream panel which is held on with poppers) and its stunning as it has fushia and AB (Aurelia Borealis) crystals so it really pops (seriously, its like fairy lights), and then we put a small amount in the neck embroidery, as well as the sleeves, I can only take credit for the neck and sleeve placement and have now decided Eithne has a flair for the bling (I am rather conservative I have now found out).
So...... its now done-ish, the tutu/underskirt needs an adjustment (extra layers) but that will be done after Christmas. My niece is very happy with the dress and the dress was ready for the feis and she danced very well in it - and I am thinking of her next dress already!
the details
the dress took about 2 metres of duchese satin (I bought 3 metres, and had to cut an extra back panel and skirt panel), .25m cream gold satin for brath -the satin was so forgiving - only one tiny thread pull after countless rushed pinning and resewing.the tutu (net underskirt) - 2 m of purple plain net, and 1.5m of shiny net although I now think it should have another layer which would be another .25 or .5 metrethe bodice lining - white handkerchief linen remnant from TWIthe pattern - 1960s ice-skating pattern - bodice used and adapted, sleeves,collar, and skirt own draft.
the machine
Few shops in Ireland sell embroidery machines, and getting to view one was a bother. I went up to a shop in Dublin (and had phoned ahead) and they could only show me the machine but not demonstrate it (less said about that the better). I bought my machine over the phone after talking to the Singer shop in Waterford, and although I wasn't able to visit the shop (v far away), they sell a good enough variety of brands for John (owner) to go though the pros and cons (and at this stage had watched shedloads on youtube).
Topaz 25, its probably the more basic Husqvarna embroidery, but it also had the biggest available hoop (280x150mm) in my budget. I was able to join motifs to get a larger spread (ie front bodice), I still don't fancy my chances on doing a fully aligned border. It is also a sewing machine, and the only thing I didn't like sewing on it were darts. There is a baste stitch on it which is a dream (which I used a lot, both to fix dress before fitting, and also to attach stabilizer pieces to the dress). My Singer Excelle has not been put to one side though as I well prefer it for tailoring.
the verdict........
It was as well in ways it was left as late as my nieces measurements changed a lot from June to September. I am glad now I got an embroidery machine as its leading me to some other ideas and will expand my sewing. At the time I felt a bit crazy buying it, but as some extra money came my way in September I justified it that way, that, future dance dresses and having a happy niece.
Donna got two sashes* in 'the big feis' - (as well as other trophys in ard grad), when the 'sash' awards are presented its a full on fanfare affair and at the end the competitors all have to put their cups in the air - and heres a photo of one!

* I am not very au-fait with the process but my sister explains it as similar to premier league, first division, second division etc in football, and that dancers start off as bun-grad (beginners/third division) and progress up to mean grad to ard grad(high grade/first division) and there is a process which I am not sure of which allows you to dance in the championship dance (premier division), which Donna is beginning to qualify for and if you place in these you get sashes...............
Things have been rather hectic lately. I have finished embroidering and sewing an irish dancing costume for my niece and due to go up to bling it on next week, and while that was being sewn, the sew social group started - no photos of either yet!. The sew social group is great, there is a brilliant mix of people and skills, and extra people coming the second week. It is to run for 4 evenings and 2 evenings to go, and I am hoping to be shown how to knit properly there soon.
I made this blouse and skirt a few weeks ago, and have worn both a fair bit, and I am still in the middle of crocheting the sweater (if a crochet project goes on too long there is always the danger of a change of heart and I will unravel it, so I am hoping to finish it this week)
meanwhile
The blouse
Red is a tough colour to photograph. The red blouse was on the euro rail. it was a light jacket/blouse with shoulder pads (and a few stains), and its silk
I laundered it, took it apart and thought to make a blouse which would also work as a base layer for under sweaters. I don't normally like collars, which was just as well as I barely had enough fabric but got their in the end. I had to peel off the fusible which was on the facing of the original blouse to use as side panels in the front - which worked out fine.
I used a 50s dress pattern as a base for the tucks at the neckline, and I was going to face the neckline but used a simple binding instead, and a zip closure at the back.The skirt
The day after I got the blouse, I was cutting out the denim dress (2 or 3 posts back) and ran into a spot of bother with the cut, so I went out for a stroll to think it out (rather than cut any further), and I strolled towards the charity shop. This tweed was in with some pillowcases, and about .75 of a metre, and 2euro. When I got home, I put it with the 'pile' and it looked so well with the blouse - that I figured I had an instant outfit. I had originally planned a box pleat skirt, but there was just slightly too little fabric.
I used my TNT pattern, vogue 7776, and did the version with the front slit. I pretty much did everything as per the pattern except I did a facing for the waistband (petersham is recommended). I left the hem at 3 inch allowance which is a lovely weight for the tweed. Had I known it would turn out so lovely, I should have considered interlining with organza (its a couture technique I think). Its perfect for a long-life tweed skirt as it helps any potential bagging/sagging issues at the seat, and its perfect for holding the hem.
I had some habatoi mock silk lining in a fun orange shade, but I didnt realise until I went to cut how off grain it was................ I was a bit shocked. So I cut on grain, one piece at a time and just about fitted it in - the photo above shows it laid out and going with grain. I cut the back on the fold and the 2 fronts just about fitted it in.
I did a top stitich on the skirt but only used sewing thread so its barely noticible, and the only other blip (besides the low quality lining) was there was a tiny hole in the weave (probably due to age) in the back panel which I didn;t notice until I was holding towards the light to inspect the dart. I put a small darn in it, and then ironed on some vilene.
so - an outfit for about a fiver - blouse 1 euro, tweed 2 euro, zips taken from other garments, lining would have been about 2euro......
I got a gorgeous grey merino men's jumper a few weeks ago. Its a large mans jumper, and a great shade of grey. The crochet sweater I am making for my grey wrap skirt is still being hooked (I am on the fourth restart ..... this better be the last version), so I thought I would make something from this.
I had a few thoughts in my head,- a wrap close cardigan with a length of satin ribbon as trim - a cropped sweater, 3/4 sleeve with boat neck- a regular cardigan
but decided on copying an item from my wardrobe. I copied a pattern from a thrifted fine knit I got some years ago. Its probably a 'neither here nor there' sweater, but its a good layering piece (its cashmere ), easy colour and gets worn quiet a bit.
I laid the sweater out, and traced, folding over the main sweater trace and cutting to make sure each side was even. In the remake I had to do a few strips to make the sleeve width, but it was worth it as I was able to do a generous box pleat at the 'cuff' of sleeve (the pleats in the thrifted sweater are in different locations and are knitted into a cuff). I would have liked (and am thinking of trying this pattern again) to give a bit more weight to the collar by doubling up the fabric (rather than using a strip of fabric and hemming it).
The sweater has a nice shape, its got a dropped shoulder, and some shaping at the waist - I kept the ribbed band in the cut for hem and its perfect. I am glad I put the one large pleat in the sleeve as it gives a bit of 'interest' and the pleats in the original are a bit puffy. The sweater is a quick sew, and works well with jeans and looks fine with skirt, and I am sure will work with the grey wool trousers if I get to remake them soon (or at least this year), and wears with the poncho too!. photo below is a bit dull - but only one taken so far.
So theres a coat, reduced from 20 to 10 to 5..... its wool cashmere, no pocket shaping dart getting in the way, long, navy, and although a mans coat, there was sufficient fabric around the hips for a remake. I got this coat last spring and put in to the 'to do' side.
There a a few things I have found useful in remaking wool coats
1. A size 10 will never make a size 12. This is an obvious one, but sometimes my enthusiasm makes me think I can. For me, generally, the best way to use up the fabric effectively is to work with the same style, and also the easiest. A raglan sleeve is best left a raglan sleeve. I also choose in this case to keep the pockets. I had originally thought to take these out and try and conceal a dart in this line, but I also thought why not just do it the easiest way.
2. Steam and rest fabric. After taking the coat apart, I brushed and steam ironed each piece. I sometimes use a water vinegar spray to help lift the pile and flatten some pressed seams and creases. Then if the fabric is rested overnight, so it can relax back into shape very well indeed. This I should have done, but I was a bit impatient and only left it for a few hours, and paid for it when I put in the facings!
3. New lining is probably best. In general the lining is often not worth reusing and it is difficult to recut, and I can reuse it in smaller projects. I reused this as it looked so warm and was in good condition, and had loads of inside pockets. However, I did have a twist in the recut sleeve linings, it doesn't show when wearing, but the seam is skewed on the inside and I only found this out after it was sewn, so I unpicked the sleeve lining hem, and let it hang naturally, repinned, resewed. Who knows if this was my cut or the old lining, but if faced with same dilemma again, I would re-cut the sleeves from fresh lining.. The last jacket I tried a cotton sheet for lining and it was not warm . Also, the slash for the slit in the original coat was left and I just did a patch repair. As its a 'casual' coat, I am not overly bothered.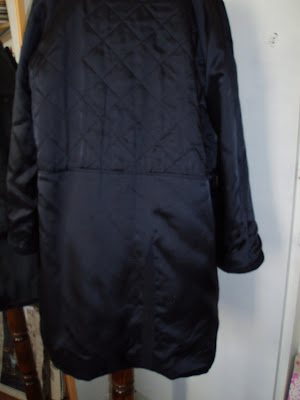
4. Press and rest as you go. It really makes a difference. It was an Ann Ladbury tip from 'Clothes that Count' where she suggested when you have finished making your coat, to give it a final steam and light press, and then to put it on a dress form overnight so it could relax into its new shape. I tend to do this as much as I can after each sewing session also, and had to do extra for all the in-betweens for this coat to compensate for the rushed start.
I had rushed the beginning of this coat as I had hoped to wear it to a lunch with my sister and in the end, I didn't as I had to rework one or two areas over my rushed start. The facings were a problem as it was a mans coat so I used the buttonhole facing on the button side (ladies side) so I zig-zag closed the small bit of button hole that was visible as the popper covers it pretty much.. I decided to go with covered poppers as closures. As the one with the silver sticky out bit was more attractive, I left this facing out, and I have poppers done both ways on various coats.
I used the collar for the neck facing and its clunky but serviceable. I was trying to save as much fabric as I could for the detachable hood.
so the coat was a fiver, I reused the lining, and the poppers cost a whole SIX euro!!!. I love the coat, its perfect. The hood is great, but as the autumn weather has been bright and dry I have been wearing it without, and I prefer the coat without the hood, but if its raining, hoods are much handier than hats or umbrellas so its great to have the option.
and finally, my friend Cathriona took some photographs.... a gazillion thanks as I am a rather impatient subject!
I love reading other bloggers sewing plans - its most inspiring, and incredibly motivating.
I am rather pleased my sewing so far, and the planned makes are to link back to my winter footwear, as these are what I wear the most, and so far, its all working out - so much so, I hope I am not speaking too soon. One coat, one skirt, one well worn poncho/shrug, and one dress later......and everything seems to be coordinating. This year seems easier to plan my makes, as I am a bit more sure of what I like (simple lines, block colours) and the limitations of the remakes (a size 10 will never make a size 12).
so for the next few weeks the plan is
To finish a sweater, (to match the grey skirt) - crocheting from a thrifted sweaterwhich should work well with a grey wool pair of trousers, yet to be re-cut (bit nervous of this one). It should be a long sleeve raglan, but I am now thinking the 'back loop only' dc/tc looks very plain, and am thinking of changing the stitch.
The denim dress has been worn lots, works well with the base-layer from last year, and works well with my new coat, (for which I am still making the detachable hood).
some blouses, I have to remake a few, and they are silk so they should be super warm. still fiddling around with what type of blouse, as I don't really wear blouses, but the silk blouses I am remaking, were a euro each. some sweaters, and strangely enough, I have picked up a lot of yellow which may not go with the emerging grey hair.... but we will see. And another skirt from some tweed. As always, these are sketchy plans, and generally need to be tweaked.
and to make something to match this suede skirt picked up for a fiver (I am not too sure what I was thinking, I am not even sure I am really going to wear it..... but if I make something for it, then there is every chance I will - in the back of my mind I was thinking handbags to justify getting it). There are some coats waiting in the wings - including this one for 2euro! (seriously still can never believe that these end up being reduced to that).
Last years black skirt and purple dress are proving to be perennials,. I am now finding I so prefer wearing my me-makes, ..... , most likely a combination of having the clothes I want to wear and unashamedly saying 'ya I made it myself' whenever its complimented (as I figure its easier to run the risk of receiving more compliments than getting requests to do alterations).
I have a bit of a thing for sleeves. I don't know is it the geometry of them, or that I have narrow shoulders, but invariably, I will justify buying and making some patterns based on 'wanting to see what the sleeve was like'.
I saw the pattern on facebook Vintage Pattern Bazaar and I loved the sleeve and the funnel neck and thought the amount of seams would be useful in any upcycle sew. Unfortunately Robin (who was selling the pattern), did not see my enquiry and the pattern was making its way elsewhere, she then got it back for me, and sent it on! (so no pressure! and gazillion thanks to Robin). The pattern is a 32 so I graded it, a bit nervously, as I don't like grading sleeves at the best of times, but as it was a raglan I felt a bit more confident (but not by much).
I took apart a purple wool suit but when I fitted the pattern pieces there was too much waste to justify the sew, and potentially I would not get the length. I did have a faded fishy denim chambray curtain (only one) so removed the glued fishes, laundered it, and laid it out. The pattern nearly fitted, and I only figured this out after cutting one piece - so I went for a walk and think (and picked up an end piece of tweed in the charity shop for a euro on same walk), and decided to made the centre back panels with a seam at the waist line, and it was a tight squeeze but it all fitted. I had to pull out the original pattern as well as my tracing to try different layouts, before rough marking and transferring to the table to cut.
The lining was easier! The dress made up easily enough, I had anticipated a different look to the sleeves and I was unsure of them, the sleeve dart sits with the shoulder seam but the sleeve and dart seem to sit forward, I took the shoulder in another tiny bit, but its just the style of dress and now that I have been wearing it a bit, I love it (I had decided that I could always take the sleeves off if I was that bothered). The dress is very comfortable, and the pockets useful. I really like the subtle funnel neck. I had been thinking that if I was to try this pattern again, I would reshape the pieces, and redraft a sleeve that had a more defined line to make it a full raglan. 
The lining was sewn with the pattern and I 'pinked' the edges. It gave the chambray fabric a better weight. The pockets were cut bigger (they were tiny) and the original skirt would have been a few inches below the knee, and I hemmed it at an inch above. The original length was odd looking with boots. Super happy with dress and it feels like a great start to winter sewing as its teaming well with my winter boots, last years made base-layer, and the winter coat that is currently being finished!
and some photos standing on 'the soon to be foundations of shed' in the garden.....
I came across this article on THE CUTTING CLASS which I thought interesting if anyone has ever felt (I certainly have) overwhelmed by less than perfect results
I made a poncho shrug shawl for my sister some time back and I love it. The colour wasn't quite right for me, but it was so perfect for her. I had made an unbuttoned version some time previous to that and I was going to remake it but still have to get around to it, as its a lot of crochet...... which was a pity, as all summer it would have been the perfect piece as our weather never got really warm.
I did remember I had a long scarf got some years back (2008) which was packed away with the winter wools so as I unpacked some sweaters and put away some summer clothes, there it was.......
This scarf measures about 180 x 70cm approx and its a viscose mix. I always like this colour. The scarf seems to curl in on itself, and it was also a bit long, it was handy for evenings but rarely worn.
The measurements of the crocheted 'pillar to post' I made for my sister, were 150cm x 60cm, so I cut the scarf to 155 cm and put some iron-on lightweight vilene strips along the hems at each end, and hand stitched each hem. This also seems to have stopped the 'curling' and now the hem sits flat.
Sewing the button-holes was a nightmare. I knew I would be placing 6 button holes along approx 30cm on each end (diagram below not to scale but shows the placement), and the buttonholes would be opposite.
I wasnt sure how I would make the buttonholes. My machine buttonhole tests were a disaster, and I had more success sewing through paper each side, but this was still distinctly dodgy, so in the end, I hand stitched them. In truth, the are a bit lumpy, and perhaps its as well that I now use reading glasses as in practice I don't notice them (and now they are done, I don't inspect them either!). The buttons came from the button jar, one set of 6 is from an old suit I have to remake, and the other from a coat from last year. If it was a white or cream scarf, then various multi-coloured buttons could have been good fun. This poncho has been worn twice as much since I made it a few weeks ago, than its whole life time as a scarf.
and the only non blurry photo of me wearing it (better try and get a better one)
The Novum was in the charity shop, and I am still wondering why I got it! - there was a logic at the time. The machine motor sounded fine but , I thought it best just to get it repaired properly and hope it wasn't a dud. I should have inspected under all the grime, as there is some surface rust, not a lot, but enough. Curiously the machine was made in Ireland which was nice to know, and it had a basic booklet, and it also had some extra feet and fittings so that's handy.
It also has some corrosion on the chrome (why oh why do I feel the need to rescue these things - I am beginning to learn to walk away) but the rubbing with aluminium seems to have smoothed out a lot,. I am less happy with this machine than the Brother Jones, as its a bit tatty here and there and the threading goes to the side, and also the bobbin winder does not work(I cannot loosen the needle), and the light fitting needs to be replaced - however on the other hand, it does sew evenly and beautifully, it has the presser foot adjuster and feed dog adjuster also but it doesn't feel as nice as the Brother! The other reason I thought it a good idea to have an extra machine, is for these 'sew social evenings' so people don't have to lug over their machines....... and I don't have to unthread and lend my main machine.... and its good to have a machine I don't feel too precious about for others to use! So that's justified its presence, and not quite the cost of repair. Eitherway, it is now part of the 'better not get any bigger' collection, and one way to get to 'know' a machine is to do a project from start to finish.
To do a test run project, I thought I would try out this skirt from Martha Stewart, its supposed to be done in a leather/suede type fabric, and has been sitting on my pinspiration pinterest board for a long time now. I had got this tweed fabric in the charity shop, and I am a sucker for tweed. There was just enough, and it is cut on the cross grain.
Originally I was going to cut the skirt and just bind the hem, but then I figured the tweed could do with a bit body and also lining, so then I thought if I sewed the lining onto the skirt and then turning it inside out it could give a nice finish - which it did, I then pressed and top stitched the scallops. I had a few options on lining and was going to use cotton, but finally decided on 'polester habotai 'silk'' lining as it could look well on the turn over without being too flashy. I am really glad I did, I adore this skirt love-it love-it love-it. I had low-to-no expectations, and am so pleased with it, and I would highly recommend it as an easy-ish quick make and it gives the quirky twist to a tweed skirt. Its incredibly comfortable, although I did cut it to big. I added an extra 14cm to the overall width to be sure but I really did not need this (it just means the first wrap goes around my waist more to the back) and could have just gone with the Martha pattern (I am a uk 12-14 in a skirt). The other adjustment I made to the pattern was to add a seam allowance all around to allow for the 'hem'. 
Wearing the skirt as a back-wrap didn't seem as comfortable for me as putting it to the front, so I pinned it in place,to decide the placement of the 'poppers' (I had thought of buttonholes I thought it would take from the simple look of the skirt), and although it may not have needed it, I put a quick stitch on top to keep the top of the pleat in place which works on keeping the fold of the wrap even (does that sentence even make sense........hope so ...picture below in any event). If I was to make it again, I would interface the waist area.
So a grey skirt sewn on a grey machine, and I have finally bit the bullet and decided to stop dying my hair (a habit from my 20s) not too sure how much grey is there but I am sure time will tell.
One of the must makes for me this summer were pyjamas - all my pyjamas were a sorry state of worn out leggings and tee shirts, so I ran up a shibori pair and two of advance 8148.

The advance pyjamas looked particularly handy as there is no button up jacket, and as it turned out, I didn't need to bother with the 2 buttons recommended. One handy thing about making pyjamas is I took as many shortcuts and slapdash as I felt under no obligation for a particular finish! My grading of the pattern was a bit off, and I never lowered the darts enough and didnt lower the pocket at all! I never noticed the pocket oversight till the end (doh!). The first pair were made from an old sheet, and I thought the taupe colour sophisticated, but as pyjamas it looks a bit more institutional - I probably should have trimmed it, but ...... that didn't happen. The main fiddly part of the pattern was the collar, which wasn't really that fiddly just something I never made before. Feeling incredibly organised having matching pyjamas!
The second pair are not yet finished. They are made from some red linen scraps and ikea pillowcases. The pillowcases were probably donated to the charity shop as they were so badly made and could not be ironed flat the weave/cut was so off, which was fixed when they were opened up. I decided to make them up on the Brother Jones machine which I finally got repaired. 

What I love love love about the machine is that the feed dogs are adjustable (my singer can really clamp the fabric), and the presser foot pressure is adjustable. It has a side loading bobbin which is fine but not a favourite as I think they are fiddly and you can never see how much bobbin thread is left. However, I can totally overlook this as the machine sews like a dream.
There were a few issues of seam puckering at the start but it could have been my threading, and I have not had the same issue since but notice the thread can stray here and there so I am keeping an eye on it. (it seems to come out of the guard easily....). Its hard to find a manual for these as there is no serial number or model number as with the Singer, so I don't know if there is any feature I am missing.
Aimee at the wrongdoll has this machine, and she made the most amazing denim skirt with fabulous top-stitching , so if I can achieve anything near that standard, I will be doing well indeed!
I got a lot out of the indigo dye pack
3 dresses1 pj2 pillowcases1 white linen trousers2 tee shirt dressesa few lengths of fabric.
I had to keep running back to my workroom for more bits to dye as I didn't think I would get so much out of one dye pack................
The pyjamas were made using the instruction from Moldesdicamoda.com (link here). The site gives basic pattern instruction but its also great for ideas (I am currently thinking of this coat), and even looking for the link again when I was typing this, I ended up bookmarking about 10 pages..........
The pyjama pants were straightforward, I used an rough all-in-one pattern which I drafted from the trouser block by lying back and front side by side and leaving about 6cm between the front and back and cutting around.
I then used the little wooden squares from the kit and folded the pyjama top, and then dipped in water and 'squeezed' the water out, before dying. The pyjama pants were tied at the hemline.
The pillowcases were similarly tied, and I should have done more of these. I had a load of pillowcases leftover from an art project years ago, so the next time I am doing any indigo................they will all be for the blue!


