Favourite colours have been on my mind these last few months, from a lovely comment left by Bobbi and also the great chat last month about favourite colours with my friends daughter Amina. I listed off mine, and she listed hers. as being 3 years old, hers predictably were pink and purple but during our chat she acknowledged some other colours weren't so bad either and a few more got added to her list. (both of us fully agreed on chips being a favourite food - conversations with the under 4s are wonderfully uncomplicated).
Part of all core studies in art college is colour studies and its pretty generic - different colour wheels and varying versions of the same still life, and generally done with about 3-6 tubes of paint. One of the still-lifes was executed in 'favourite colours' and it was definitely the most interesting one for me and now that I am sewing again, I find I am picking up and sewing these colours. I was curious to find the colour project notes (I couldn't find it all but found bits of colour wheels) so I thought I would mix them again - I remembered them easily enough as I remember the still life I painted in them, and also that they related to a piece of fabric (a scrap I still have that) I had been sewing at the time.
As I was mixing, the only trickiest one was a pale yellow pink peach, I couldn't fully remember that exactly (and was a surprised that such a specific came back to me) and in general they began to remind me of the Holbein Palette, and that the tones are all very earthy and organic.
And speaking of Holbein, I have a doodle below based on Holbein I did as a daily drawing (or doodle) challenge some years ago, and still quite like it!
I digress, the reason I put it this all down, is that I was thinking how I got into some buying habits in the last number of years that related less and less to what I essentially liked, but were based on what was in the shops, and what is in the shops are the results of fashion/trend/ and colour forecasters - and my wardrobe was beginning to accumulate a lot of grey and charcoal, and possibly looking a bit downbeat as a result. I don't know if anyone else has gotten caught in this predicament?
My colour palette has also become useful in choosing what I buy as I am a bit more focused so my charity shop buying criteria is based on
The colourThe fabric (quality, weight and content)The seams (less the better)The price (in general, I like the markdowns as I like to think that this is the stuff no-one else wants so a bit more of a challenge)
I am also looking at my own wardrobe doing a bit of an edit and think my own colours are more appropriate to me and mix in with each other easily. However, trying to get it all down to 33 pieces.................(into mind blog has rather focused me)................ well there's a real challenge!
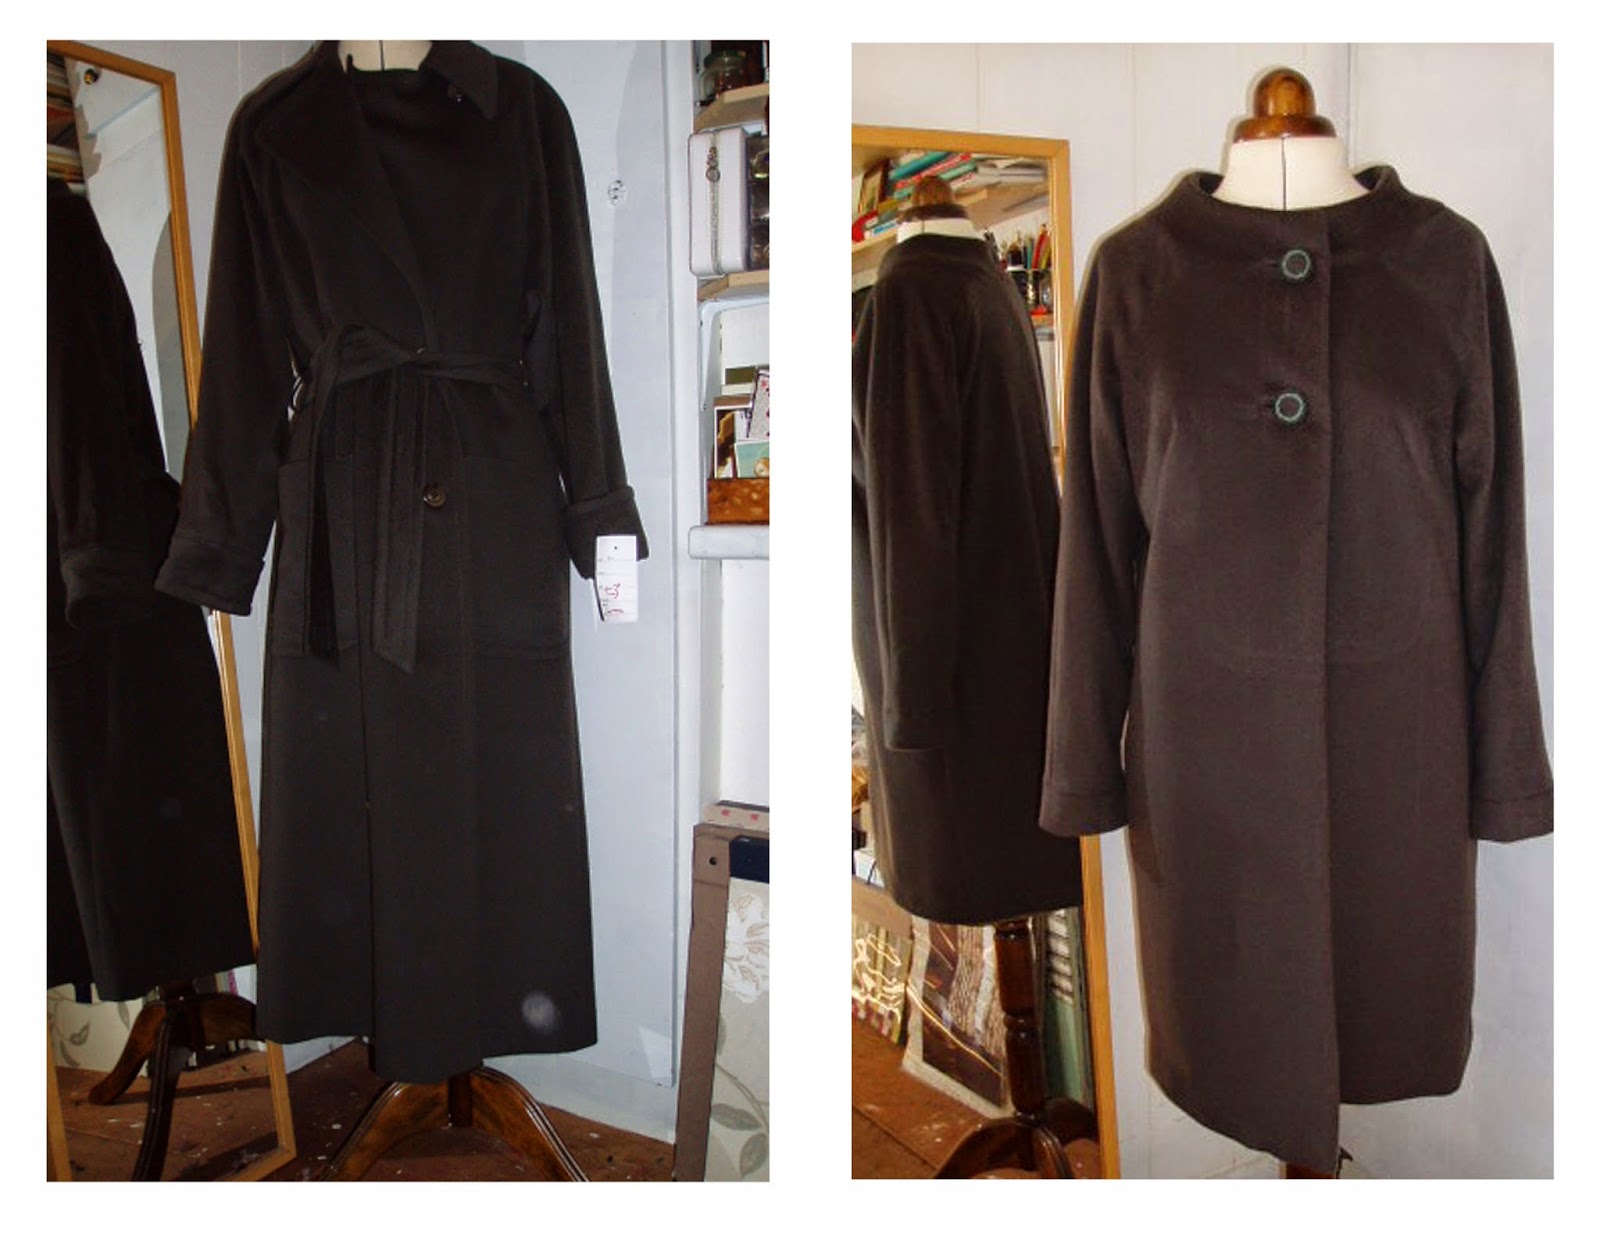
 So .................another coat - I got it about 2 months ago (yes, possibly an coat addiction here) , and still amazed these coats are so cheap, this coat was was 3euro, 50%wool 25%lambswool, and 25% cashmere and a good neutral colour, whats not to like (nobody wanted to buy it for 20 so they reduced it to 10 and then to 3) Strangely enough the more 'fashionable' coats with lesser quality fabric sell quicker, and for more......the mind can only wonder.
I decided to try this butterick pattern as I could go with the cut of the raglan sleeve, but as the coat was a size 10 UK I may have just enough fabric (not nearly enough it turned out) . I had no instruction for the pattern, but at the last minute, and as a just-in-case, I put a post on the we-sew-retro FB page, and the very kind Samantha photographed a set of instructions and posted them which was a very lucky break as this coat got the better of me. I seemed to have constant love or loathe moments all through the making-up.
The Cutting
I usually work with a few givens, ie centre front and centre back are usually on grain (but will deviate for back vent and collar etc) so I usually lay out and mark, and then find a piece I can do a double check on (ie rip) and square out from that and double check. I wasn't happy with one of the backs after doing some pulls on the centre back line as it seemed to have a bit of give, so after marking I did a grain check near hemline..... and the grain was off..... one back was fine and the other went slightly off but over the course of the length of the coat this meant it was off by about an inch at hem. This threw me as I didn't know who was wrong, and if it was really off and that it shouldn't be.... I went with my grain test but was a lot perplexed (I was even imagining all the scenarios of what could have happened years ago to put the cut out....)
So when I went to cut the sleeves - there was no way I could get the cut and the grain........ so I didn't. I went with the grain of the previous sleeves and hoped for the best. I could have gone with 3/4 sleeves but that would have given an odd balance to the coat and as it was it looked like a small cuff would happen (its a half size pattern and if I was 5'3" the sleeve would have just about fitted). I was so determined to make up the pattern, I steamed ahead and lowered expectations.
The Sewing
The fabric is gorgeous, really, and as usual, wool is relatively easy to sew. I put in the buttonholes first and thought I would try Ann Ladbuy method of piped buttonholes - I have been watching Clothes that Count on bbc archive , as she starts in the middle of the welt, and I liked how they turned out. As I had no buttons picked, and the original coat buttons were a bit ordinary, I thought I would cover some (and as luck would have it, the button tin had a pack of them I must have picked up in a bargain bin), I covered them and did a quick chain stitch to 'lift' them.
The facings gave the worst problems as I had not enough fabric and they were patched together and caused the front of it to kick out, I then remembered there was fabric in the belt, so made the facings in two parts, and they seem to work better. The lining was reused but its not great, as there were some tear marks in it, and its a compromised cut, however, for the moment I will not buy any.
The Sleeves -When the coat is on the mannequin, the off grain is pretty or not-so-pretty obvious
The patch pocket marks are barely noticable - but do show in the photo so just as well they are balanced!
The pattern
I would highly recommend making this pattern, seriously, its lovely. If I had the chance or could realistically justify, I would make it again, it would be a lovely coat for a summer wedding or a formal/semi-formal event (the curtain in my workroom is an old length of cream wool coating and I was eyeing it up towards the end of the sew!) The hang of the coat is gorgeous, its so simple and I think slimming and I even feel taller when I put it on. The coat having only two buttons adds to the elegant look,, but makes it less practical as a day-to-day coat.
So will I wear it......
Not too sure. For the moment the hem is tacked and the lining sewn in place only at the neckline - and I can alway size it down to a smaller item. I started on another coat remake for the end of the month and lessons learned from making this coat are already paying off! I am also due to remake a red coat (2euro - unreal) in a few months time and this red coat will be my new winter coat. I adore the cut of this butterick pattern, so I may take elements of this coat for the red coat. I am thinking the red coat will be restyled, as opposed to remade, as I will keep the buttoning detail in the red as well as the pocket location (but not pocket style), and the raglan sleeve, but for now, only April sewing beckons!
Update 15/03 - when I look at the coat photographs now, the sleeves are too long and the balance is off - I think 3/4 sleeves could have worked better with the shortened hem? or the coat taken right up to be a jacket? already considering options on remaking................ However, the short coat I am working on now is looking pretty good....
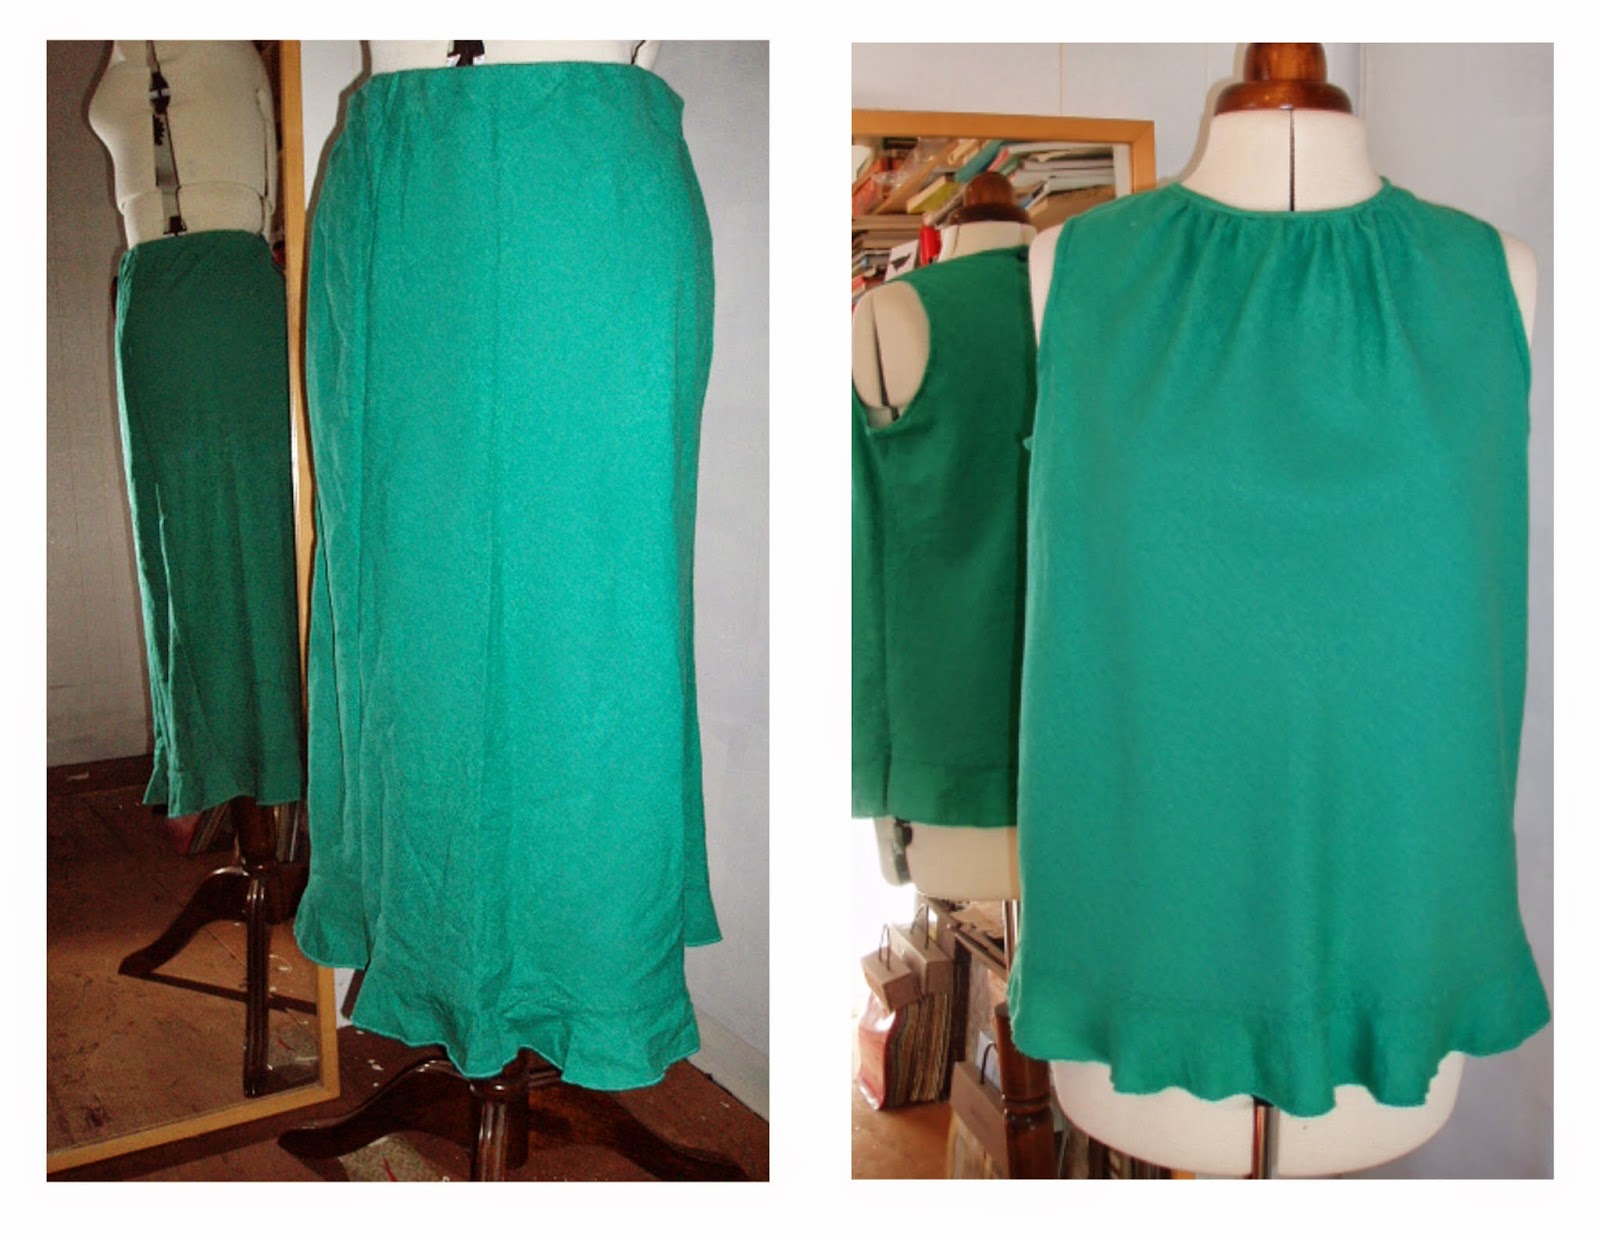
This poor skirt was sitting on the euro rail last year - I got it as I like green, and its a viscose linen. As a bias skirt - I wouldn't be able to wear it, bias enhances any potential curve (I think bias skirts are to be avoided at all costs for pear-me ......) but as a top it could work out quite well indeed - I probably should have ironed the skirt before photographing as the creases do it no favours.
I had come across a few versions of this marfy top online, and I was also curious about their patterns as there was a discussion on them somewhere on fb - so as this pattern was free, it was one way to find out. I cut for a size 44 and did french seams. I double checked on seam allowances before cut, and there are none so I added 1.5 all round, and as there would be no hem allowance, I decided to use the frill as the hem (which turned out to be an excellent decision).
I ironed a crease at the centre front and centre back of skirt pieces to get the true bias, before laying the pattern over each. In the pattern layout photo, the pattern is laid on the fold and then the side seam hem edge is at the skirt frill join on both, so that worked as my 'marker' or notch when I went to sew, I then marked 1.5cm seam allowances at the sides, armholes, and neck. I put a small facing on the back for the opening, and then sewed the top, gathered the front and then bound the edges. I decided not to use the neck band as I had seen one version without and liked that, and when I went to cut I may not have had sufficient fabric for the bands (judging from what was left over). The top was quick enough to run up, and probably quicker for anyone else as I tend to hand hem bindings (my machining of them is rough at best), but in all I think it was 2 or 3 hours (I took apart a dress in-between).
I am incredibly delighted with the top. This marfy pattern was easy to use but I don't know how true this is for their other patterns as they seem to give limited instruction from what I gather on their site - but then again, early vintage patterns don't give too many clues at the best of times either!. 
Uaine (wen-ya), is an old Irish word for green - it is specific to something being coloured green as opposed to naturally green, and this month is going to be a Uaine month! In January I did a bit of a rethink of what I was at with all this sewing and cutting, - and I am still without a master plan but now have a modus operandi!!!! I had to find some focus, as I seemed to have lots of ideas, and projects started all over the house. So now I am doing projects by the month and by general colour or theme as when I went through everything it turned out that there is currently enough charity shop buys to see me to the next 5 months of making! (its far too easy when things are 1 and 2 euro) So I divided them into colour and drew up some plans for each, and also catalogued my small stash, so now I am only working a month at a time to stop me flitting from project to project, and have a bag with the next 4, but no more................
So the month has come to an end, and as its march next, so making way for some green makes!
This week I finished a skirt and nearly finished the skort I had to launder both skirt swatches before I used them and thankfully neither shrank, so it was off to a good start.
The skirt was made using the vogue pattern 7776, and a pair of black trousers, pretty straightforward as this pattern uses petersham instead of a waistband (big plus, easy and comfortable), and I reused the zipper from the trousers. I joined black fabric to the swatch in straight edge strips and then cut out the skirt front. Its a nice skirt and worn a bit (constantly) last week!
The skirt put me in a very optimistic mood and this as well as some fine spring weather, had me making the skort. I was cycling a few days ago and the weather was so sunny (not warm just sunny) which put me to thinking of making the skort in the same pattern. I used a linen/viscose skirt for skort back and shorts front, and had to make the short backs from another piece of linen from a pair of trousers (same shade and weight and as they would not be seen I felt 'safe' enough)t , and the swatch made up the front flap.


I am a bit / lot / seriously unsure on the skort. The heavier weight of the swatch by comparison to the linen may or may not work, I put some interfacing on the pieces around to work better with the panel The instructions were a bit fiddly and I am unsure if I did the hems the correct way. so I have basted hems for now. Its not summer for a long time yet so plenty of time to figure final details. The front of shorts, back of skirt were made from a skirt, and the back of shorts were made from a similar shade and weight of linen (linen trousers).
The closure will probably be a button at the waistband as I think putting buttons on the lighter fabric could pull on it. I will wear it about the house when the weather warms up and figure it then. I am still undecided on the front section, as I don't know if it looks too much like patchwork? However, as its a summer skort and a lot less revealing than my tennis skort - so perhaps a lot more practical.

I have still plenty of swatch books! and and will probably be dipping in here and there for the next while - the black bag contains potential projects................. which means the mannequin will no longer be covered 24/7 in clothes and swatches trying to get colour matches
So another bag - and another unknown quantity of time spent on pinterest (sometimes I feel like Alice in a pinterest rabbit hole). Anyway, I have also sorted some boards so now one board is only for pinspiration and is edited as each project is done.
This bag, origami bento, is easy peasy, easier if you don't line it (which I should have done, and then flat felled the seams to finish them). The handle on this is a bit clunky looking, as the fabric is doubled but its a minor quibble. It has the feel of a beach bag, and takes less than an hour to make so is well on the way to top 10 quick-sews. If I make this again, I will make the side dimensions of the main square 15inch instead of 17inch and not line it, and consider a lighter cotton strap tie knot!
The tablet cover is for my friend Cathriona, who I am teaching to sew (as she taught me bodran - irish drum), Its should be pretty straight forward. We were supposed to sew today, but she has her law exams so we are leaving it till they are over. While she was sewing, she was to bring her tablet so I could work on making a cover. The idea is to have a fold over wallet. I have posted photos of the cut out for the moment.
The cardboard will fit inside the wallet, and there will be pockets on one side and the other will hold the tablet. The tablet holder tabs will either be in the clear plastic from swatch book covers or elastic bands. Either way, it wont be done till next month and I will post it then.
And finanlly, I tried out google drive for uploads to download (as I want to put up a pattern next week) and I uploaded a 1930s pattern catalogue and the link is in the 'down-load-able' page. I was given this by my sisters mother-in-law. She said it was from clearing out the local church sacristy (I think), and there were some church crochet patterns for tablecloths, and one maudella pattern.................... for an apron!
The catalogue is so interesting, and I love flicking thru it every now and then,it just seems so curious - from the patterns suitable for renovations, the one ones for short lady (you just have to quote 'short lady' when ordering), and the nurses uniforms...... (I originally thought it was a nuns habit). Hope you like it!
These swatch books from Kathy are amazing, and coincidentally last week just as I posted the patou top, I got another text from Kathy with the offer of more books - and more fantastic books arrived that evening. Big thank you to Kathy!
James has been looking at the covers and is taking them and the metal corners for book bindings (he makes his own sketch pads), so they are slowly being used up. There are a lot that will be left for cushions and curtain trims, and later in the year.
This week I was playing at a few things themed red and came across the pattern for the yy bag.
The linen pieces in the swatch books had a great tight weave and sheen finish, so were perfect for this bag. The bag made up in no time at all. I only changed the base as I had cut the brown linen piece in half as I had matched it with last weeks top at one point, but I made up the outside length for the yy bag easily and top stitched it and then lined it with an old pillowcase. I used an iron-on woven interface on the lining only.
I had also a belt that I could cut the leather strip handle from, so it was all was going so well - until I went to look for eyelets. There are so many advantages to living in a small town, finding large eyelets and small rivets for your new handbag is not one of them! Luckily there is always etsy - so they are on the way and I will update the finished bag when they arrive............... and hopefully the eyelet tool here will work! The yy pattern is a dream to work up - and I am thinking of enlarging it for a shopper - once the eyelets arrive (its now the chinese new year so the last update via etsy seller is there will be small delay). I am leaving cutting the handle until they arrive and will update the photo then (assuming my rivet and eyelet tools here work!)
Update - finally finished 22nd April - love the bag, eyelets were messy as I didn't get tool but improvised with hammer, pliers and plastic lino tool handle!
One book cover was made into a lil cat tent. I saw this pic, and had to make it. We have two cats and they are still adjusting to last years move to town after the previous 4 years living in the woods (we lived beside at 100 acre wood previously) so they don't spend as much time as they used to outside. The tent was inspected but it is of little interest currently while there are better seats nearer the fire!
and as its valentines - the anthropologie blog had this instruction, so I made this from some of the wallpaper samples......................
 Just before Christmas, I got a text with an offer of some old fabric and wallpaper swatches from an interior designer friend. Obviously said yes - and what amazing swatches books they were. They are mainly Zophany - so seriously swanky stuff! I opened up some books, divided the swatches into colour, and then kept re-arranging them....and seeing what end pieces I had which could be used up.
I am trying to finish writing up some patterns for upload before the end of the month, so this would be a perfect opportunity to get some small projects done and write up the last bits of pattern - and for the most part these swatches will be bags, cushions, slippers, but I am hoping to get some incorporated into clothes so I tried to make a small top this week.
First up - the patou top. I had hoped to make the coat from this pattern , but that is not going to happen for the moment, so I did like the look of the top, and wanted to try it out.
I made up the front from a series of rectangles and used a grey band at the bottom from a 1euro charity dress which was a good neutral for backing. The colours looked good together but the fabric weights differ enormously - so I lined the inside with fabric instead of facings. It should be okay, but the grey fabric is a very thin cotton silk, so I am going to baste it at the hem, and launder and then see if it needs a different treatment at the hem. I have another swatch of this which I am still putting together with some odds and ends here so may try to make that that up yet for my unsuspecting sister..................