Friday, 14 August 2015

sheets and shibori - dress 3 - vogue 7458

vogue 7568 shibori sheet dress


Of all pattern illustrations, these 70s vogues are my favourite.  I just love them, so 'had' to get this one when I saw it.


This dress is incredibly simple - big plus.  I made it up from a sheet to try it out, realistically I am unsure I would wear this low a v-neck- can you call it a v-neck?


The making of the dress was relatively easy, it is 4 triangles and a belt.  I should have put more interfacing on the belt to make it work better, ( but ultimately it would have worked better in a polyester or double knit to get the full effect).  The seams were finished with my new favourite,
e-bay purchase,  the pinking shears...... easy peasy and so fast.


vogue 7568 shibori sheet dress
I did the shibori effect, but was a bit lazy about the stitching.  I originally wanted to dip dye, but this would have been harder to manage and possibly a bit of a disaster, so I am glad I decided against.  I did a running tack stitch around the dress.  I changed threads every three rows so I was sure to be on the correct row.  This was unnecessary but was handy all the same.  I gathered each set of three threads from each side and tied and trimmed as I went down through each set (lower set of photos).    I worked on this dress inside out, so the dress went into the dye vat inside out which gave the right side of the dress a more textured effect which was a bonus.  
vogue 7568 shibori sheet dress

I hand stitched up the front and sides as they are cut so so low, but then undid the front as it seemed to take away from the overall effect!  Ultimately, the sheet fabric is too heavy for the dress,   However, like the other dresses, once it was dyed, it became infinitely more wearable, but I don't anticipate wearing the low cut, and am thinking of using the fabric again to make a similar style but buttoned up.......perhaps.  

However, I won't decide on this until next year and by which time I will ask my my curvy sister to try the dress on to see what the fit is like on her..


vogue 7568 shibori sheet dress


I am unsure as to which way I think the belt looks best......... I think I like the left view best.

vogue 7568 shibori sheet dress


Friday, 7 August 2015

sheets and shibori - dress 2 - calvin klein vogue 2690

sheet shibori dress vogue 2690 calvin klein
I am showing 2 friends of mine how to sew.  Sewing is a skill I take for granted, and sometimes I don't even consider it a skill as its just something I have always done - and so, I am often a bit surprised when people profess to not being able to sew (as deep down I still think its innate!).   I had to learn to take a step back and slow down on what I am showing them, and concentrate on making sewing samples.  Originally, I had planned that we would start off with making some easy sleeveless tops with a button close, but I was really putting them under pressure, so, I showed them how to sew different seams,  and we made some yy bags.  


sheet shibori dress vogue 2690 calvin klein

I am hoping that we will try a simple dress soon, so I got this pattern to show them how to work from a commercial pattern and I was hoping also if I whipped one up, they would be inspired to give it a go.  I think this would work as a jumper dress in a heavier fabric, but this one started off as a sheet.

Its a handy pattern, no tricky openings and no darts.  The main shaping is a subtle boat neckline and slight cap sleeve.  The dress curves in a little bit towards the hem.  I graded out for my hips.  


I did a 'spider web' shibori effect by winding around some button thread and tying it, and dampened the dress before dying  It was pretty quick to do, and very effective in the end!.  This was dyed right side out, and the one thing I have noticed about the indigo dying, is the inside out produces a less even effect, which can be more pleasing a more textured look is the aim.  (below is a photo of the inside).
sheet shibori dress vogue 2690 calvin klein

Quite pleased with this one, as it took no time to make, and required the least effort.  As a plain white dress it was fine, but highly unlikely that I would have worn it, as it still had the sheet quality, however, its a completely different look as the indigo, especially as the sheet has the worn soft quality, and so wearable..... love it love it love it - feels so summery and beachy  - don't think this summer will turn around but beach ready for next year! below is the side and back view
sheet shibori dress vogue 2690 calvin klein

Friday, 31 July 2015

sheets and shibori - dress 1 - asymmetric sheets

The last few weeks I have been so preoccupied by the Irish Dancing dress.  For the most part, its been trying to get embroidery drawings together and staring at black pages.   Its still not fully figured out, but most of the embroidery drawings are done, but they are currently hand-drawn, which in my case means they are not perfectly symmetrical, so I have to fix, and scan, and then try to get using an embroidery machine if I can. 

In between times, and as a bit of a distraction, I started making up some sheet dresses to shibori dye.   I got an indigo dye kit on amazon, as I have never used indigo before, and made some dresses up in patterns I wanted to try out, and lots of white sheets waiting........

sheet dress shibori


When I decided to remake the chevron halter from the last post, and a totally different dress started to evolve.  It was a straight across halter instead of a v, a cross-back-straps instead of neck tie, and an asymmetric front.    I drafted a pattern and used one of the front darts as a seam, I don't know if I should have distributed the darts differently but the pattern I drafted fits.  (I am not fully happy with the dart locations).  the skirt is a drop waist, and a-line at the back and the front drop is flared out.  The original back of the dress was too low, so I added a panel.  I think the drop waist may be an inch lower than it should be, but I will think about that again.
sheet dress shibori

I folded in the side front seam and did one line of running stitch up, and this made the shibori effect 'ori nui'.  I wasn't really sure how it would turn out.  The indigo is a small bit blotchy in parts but in all, its blotchy/textured throughout so I am hoping this adds to its appeal!  I have to finish straps and hem, as I figured I would wait till it was dyed to work out the final details.
sheet dress shibori

The indigo dye was so interesting but I should have probably prepared better.  I did it a day sooner than I intended as the weather here has been very damp and last Thursday (yesterday) was dry and a tiny bit sunny, so I took my chances.  I didn't have a 5 gallon bucket, so I used the bin liner (as I had a 'lid' that fitted over it) and I worked outside.  The dye goes a long way so after doing the pieces I needed, I scurried to dig out some other fabric bits and kept going.  I was so amazed at the oxidization process, it comes out of the dye vat a green yellow, and turns blue in the next 5 minutes.  The dye times were hard to figure out, (most pieces were left in for a few minutes) as was the amount of 'bloom' at the top of the dye mix but I kept going none-the-less.  By the time I did all my pieces, ! went up to the work room and got more to dye, the garden was full of fabric hanging everywhere and the sky clouding over.   I should have had a rinse basin going earlier, but I didn't have one at all.  I finished the pieces by putting them in the washing machine to rinse and spin.  I was well glad I decided to work outside as the clean up was far easier, but  I have a few reminders for 'next time'

1 - use a shallower basin (I only used the bin bucket as I forgot about another container) and use a garden sieve to keep the sediment to the bottom perhaps (I was conscious of not letting go of the fabric
2 - have a rinse basin to hand
3 - not to empty the dye for 12 hours - there is a white patch on a pair of trousers I hadn't seen
4 - find out how the actual times and perhaps use a timer !

It would be very interesting to do a workshop in one with someone who works with indigo and I am considering that perhaps for next year, I have not come across one before, but then again, I was not looking.  I am quite pleased with the results, but if I had to dye larger quantities I would probably stay using dylon machine dye to get a more even result.  

and if anyone has used shibori, I would love to know any tips you may have .......

Tuesday, 7 July 2015

3 sheets to the wind - more sheets to follow

..... this time last year I started the blog, pretty much 'just to see what happened next'.  I had a few ideas in mind, and the core being -to make clothes by re-making old clothes, and for these to be well made - as in they would be everyday, wearable, and long lasting (slow fashion)  I was also a good challenge for me to focus a bit more on my pattern drafting skills which were becoming as ad-hoc as my sewing (another set of bad habits to undo).  

I was always making things growing up, and from about 14 or 15 I started making my own clothes at home (as opposed to the ones-made-never-worn from Domestic Science/Home Ecc in school).  The fabric for my own home-mades invariably came from the linen cupboard, in the form of white sheets - later dyed charcoal due to heavily diluted black dye!.  
A lot of Irish linen cupboards and hot presses had these sheets tucked away, they would have been hand-me-downs, bottom drawer, and wedding presents and on the 70s arrival of printed and coloured bed-linen (known here as 'american sheets') they were relegated to the back of the press.  These white sheets are regularly in charity shops and I regularly buy (and I have to stop myself acquiring excess at times!).  A lot are these are the old sheet sizes so have to be remade, and the quality of the cotton is so lovely. 

Last summer was a fine summer (as opposed to today being about 17degrees and heavy rain), and I wanted to try out a pattern using up some charity shop sheets.  I made this, using a halter pattern I had been playing about with, but using and extending the same darts was a bit clunky looking (not easy to see but I tried to continue some french darts to the back on a diagonal) so I left it to one side meaning to try another halter top, and I also had a rethink about my ability to keep white bodices clean......  I did like the overall construction, ie making the 4 parts of 2 fronts, and 2 backs and sewing together.  It reminded me of a dress idea I also like from a favourite book 'The Art of Sewing - Shortcuts to Elegance).  The book is on loan to a friend but I will insert a photo here of this 'dress from triangles' when I get it back.


Meanwhile, here is the opener - chapter 1 from 'The Art of Sewing 'The Creative Touch', which give instruction on refashioning clothes, embroidery, and crochet and knitting.


I don't know if anyone has these books, - they are a series of about 10 or 12, and are on Amazon at various prices so I am thinking of getting some more.   I got my two (shortcuts to elegance and the creative touch ) from a charity shop a long time ago.  They are good fun, and informative -the sewing instruction is excellent, and the photos sufficiently dated to be entertaining, and the models are not photoshoped so thats an added bonus!  


I am planning a few more sheet dresses and have ordered some indigo dye to try our some shibori techniques.  The halter pattern has altered a lot - the v neck now a square neck, and the hemline is moving.  

Sunday, 28 June 2015

Its all sew pants - cigarette pants, trews, ankle grazers..............

Trousers are something I find easier to buy off the rack, I find making trousers a pain and fitting issues too fiddly so buying off the rack and taking the waist in often seems easier (my waist is two sizes smaller than hip).  Making tops, skirts, dresses and coats are what I prefer, and yet I wear jeans more than skirts on average due to practicality.  

Part of my sewing mission has become to make a handmade wardrobe and now I needed to make some trousers!  I started a pair last month, and based it on a butterick pattern I had done a toile for last year.  I cut the trousers from a linen pair, but the weave was tighter, and the fit was awful.  In part its a vanity issue, as I was in part relying on the ease allowed in a pattern rather than just using my brain and a full set of exact current measurements (seriously, there are times when I have worked from an old set of measurements thinking that these measurements still apply.....dream on......).

So I figured I would take a break from them, and in the meantime, I found these jeans (stretch fabric and a size too big) in the charity shop and also in the colour I needed, so I figured I would do this one from scratch.
recut refashion jeans

I drafted a Jeans block with current exact measurements, and laid it over the Butterick 2704  to combine the two.   (I love the high waisted fit from waist to high hip fit in the Butterick) I used the jeans block for the leg however, when I laid it over the trousers fabric, it just about  fitted  and the leg line of the jeans were in a different direction (coincidentally the same as the Butterick).  So I adapted the leg, and started on a muslin. The fit for the most was great, except now there was too much fabric under the back seat, and I was relying on partner J for critique, and a make-up mirror as a rear view on the full length mirror.    I tried a 'fish eye' dart, but it didn't improve anything, and even Allyne Bane (sewing guru go-to book) no insights, so I went with taking the excess fabric out in a dart going straight up the middle and it fixed it a lot so I undid the muslin leaving dart in place, and retraced the pattern, then I went ahead with pattern and cut.  


recut refashion jeans


I had to chance a few things when cutting the trousers from the jeans, I left the front pockets of the jeans intact, but sewed them shut as they would be too high up.  The front zip was removed but the stitch marks are still there but not hugely noticable and are in the correct place for a ''zip'' (the real zip is to the side which I prefer), so actually look fine, and I removed the back jeans pockets and I later replaced them after sewing the trousers.   The stretch fabric gave a generous fit so I took the side seams in about 1cm more and got a smoother fit again, the photo below is before the trousers were taken in. The fit before (mirror photo) is a nicer trouser fit (the left leg is the unaltered, the right leg is half taken in...), but the fit after taking them in, seemed to suit a jeans fit more 


recut refashion jeans


 I am so very happy and the trousers were worn straight away (which is always a good sign) and I finally have a proper trouser block sorted now - which is just as well as I have a pair of wool trousers to re-cut this Autumn!  The simplicity top still needs to have the tucks adjusted at the waist by taking them up one inch which I knew needed to be done, but really know now after seeing the photos! (the outfit got its first 'outing' in these photos, and after a 90 minute drive and 5 hours of watching irish dancing, the photos were taken .............. ) 
recut refashion jeans


While this was going on,   I have repaired my favourite jeans with sashiko mending (thanks to seeing it done by Karen, at RUDE) and its brilliant, I love the integrity of these repairs, its not trying to hide it, but makes the repair a thing in itself.  I normally darn on the machine using a zig zag type stitch, but ultimately it doesn't work that well with the stretch denim, I think it stresses the fabric more, so this time, I ironed black woven vilene (all I had) on the inside, stretching the jeans a little as I pressed, so the vilene had a wrinkle (deliberate) to accommodate the stretch.   I then did some running stitch with button thread, but then started a type of cross stitch.  What I did was a bit crude, but I love it.  I really like the honesty of the hand stitch and its also a lot more sympathetic to the denim than the machine darn (I think) and  its stronger as it moves with the fabric it a more sympathetic way.  There are some gorgeous examples on pinterest, very inspiring! 


Friday, 19 June 2015

simplicity 2120 -summer top from pillowcase, needs, wants and must makes

My sewing this last few weeks has been a bit chaotic  We are getting some building work done (windows, and external wall fixes).  We bought an old terraced house 2 years ago and are doing chunks of it over time, so huge heavy blanket lined curtains were taken down, some blinds made and still dust everywhere. I don't like or loathe making blinds, but as I can sew, I feel obliged to make my own, and luckily found some curtain fabric in the charity shop that suited perfectly, and while I was there, I saw this pillowcase.  


simplicity 2120 - pillowcase to top


I wanted to try out the simplicity pattern for a while, and have in mind to remake a yellow silk top, but cannot decide on sleeves or not, and thought I would try it first with the pillowcase.  There was not enough fabric, but I figured I could add some white fabric for facings.  Then, I thought some blue trim could make it less patched up, and put that in the mix,  The lace trim was a bit fiddly, but the sewing straightforward. 


simplicity 2120 - pillowcase to top

simplicity 2120 - pillowcase to top

I cut as much of the bodice as I could from the pillowcase, and  I put the trim and a strip of white fabric at the hem line, and I put a block of fabric at the neckline.  I relaid the pattern again, and shaped the armholes and neckline then marked in the darts and tucks and went from there. 

The summer has been slow to start here, so although I started this top 3 weeks ago, I only put a zip in yesterday!  Temperatures are on the rise and it feels like the weather is not fully committing to summer yet, so I have not got a chance to wear it outside yet.....and  I am looking forward to wearing it.  The only thing I think could be changed, is to raise the waistline a half inch.  I am high-waisted and think it sits a bit low, but then on the other hand, maybe it looks more casual like this? wearing it for a day will be the only way to find out..  The tucks also give it a nice casual look....and equally the tucks will be easy to move up a quarter inch, and the pattern has the back yoke higher than the front, so in profile it looks uneven, and when I make this again, I will put these at the same level.
simplicity 2120 - pillowcase to top


Other than that, I am planning the next bits of sewing, and they are broadly:- needs, wants, and musts..

The 'need' is to make some pyjamas, the ones I have are coming beyond redemption and my pjs tend to be old tees and leggings and they are even bit worn out by the time they become jim-jams,  so I am thinking of making some nice (and some swanky) ones in the next while, this in part came about due to my fixation on 1930s beach pyjamas that featured on the we sew retro facebook post in February.

The 'want' is a pair of blue trousers (ankle grazers) for the summer as ultimately I find I wear jeans or trousers more than skirts, and I have one pair of very faded black ones, so hoping to make a blue pair (a match for the pillow top).  I am assuming we will get some fine weather, as I am also planning a shibori summer dress!

And the 'must' is to make an irish dancing costume.  The promise I made my niece last year to make a solo dress is on and so is the pressure.  I am trawling pinterest for ideas, so my feed is now a mix of demure vintage and OTT irish dance dresses (its a case of more is more in that world).  I have made a bodice to check her measurements, and hopefully we can pin down some ideas as I think the deadline is September..................

Friday, 12 June 2015

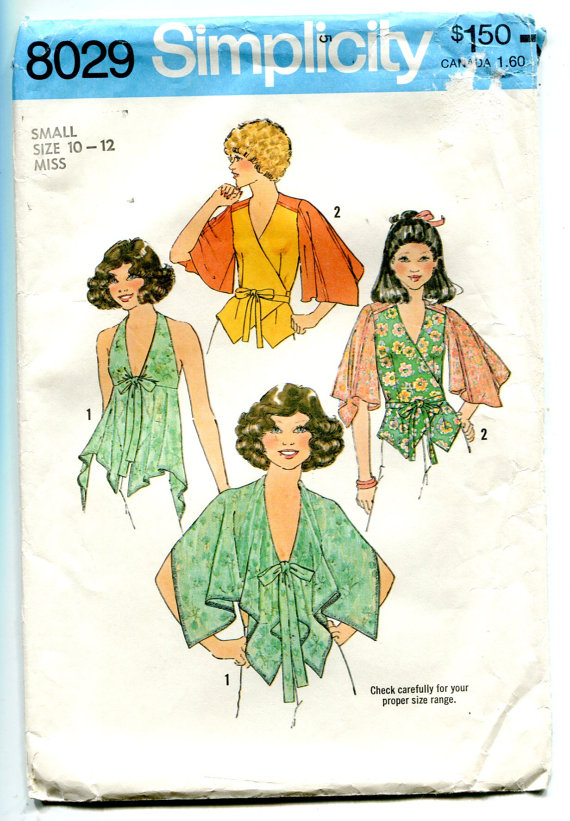
simplicity 8029 - skirt to halter for fi

Finally the temperatures have increased.  I made this top some time ago for my friend Fiona, and have only gotten around to posting it to her this week, and posting it here now! 


I got this silk skirt some time back, I loved the subtlety of the colours, bu they are not colours that I wear, but would suit my friend Fi, and I also wanted to try Simplicity pattern.  Fi can wear those 70s styles so well, and I am unsure if she will wear this but I thought I would do it anyway!  
.


It is a simple front tie halter.  and convertible to some kind of cape, which I think can only be useful if you want to shield your shoulders from burning.....   It looks a lot more functional in the illustration!

I used up all of the fabric from the skirt, and used the lining to bind the handkerchief edges and line the 'bra' part.  I did a fair amount of hand sewing in the finish as it was a very very very thin silk.